The 2001 Kia Rio uses two tapered roller bearings. They are different than the majority of bearings. Most shops don’t seem to know how to replace them correctly, or even care to refer to the Kia service manual. I went through six bearings in 24 months, and four of them were done by the Castrucci Kia dealership in Dayton. After spending over a thousand dollars on shoddy work, I decided to do it myself. It took two weekends, but my wheel bearings have never run this smoothly in years.
Principle of Operation
The spacer is the most critical item in the wheel bearing. This is how it works: when the axle nut is tightened, both the outer and inner bearings will be pulled towards their races. If the clamping force between the bearings and races is too high, the bearings will be under excessive compression. The typical torque applied to the axle nut is about 150 ft-lb. This is sufficient to completely lockup and crush the wheel bearing. This is why there is a spacer. The spacer takes up most of the clamping force, leaving the right amount of force to hold the bearings against the races. In other words, even with 150 ft-lb on the axle nut, the bearings will be just snugly held against the race, and not with a crushing death grip. This process is known as preloading the bearing.

The spacer has to be the correct length to make this happen. There is no one size fits all. The exact length is specific to each bearing and each steering knuckle. It can only be determined with the steering knuckle on the bench (and not in the vehicle). Kia recommends checking the preload and spacer every time the bearings are disassembled. There is even a technical service bulletin that says reports of repeat wheel bearing failures were due to improper installation. Surprisingly none of the Kia shop technicians I spoke to were even aware of this bulletin.
How to set this preload is described later in this post.
Removal of the Steering Knuckle
Though it sounds ominous, removing the steering knuckle and wheel hub is actually quite easy – easier than changing the engine oil because you don’t need to crawl under the vehicle.
First, the axle nut should be loosened. This is much easier to do with the wheel firmly against the ground. So, do this before raising the vehicle. Then the brake caliper and rotor need to be removed. The caliper is held by two bolts, and the rotor is held by two Philips screws. Once the rotor is off, the wheel hub should be visible.

Next, the steering knuckle has to be removed. This is what holds the wheel hub, bearings and races. It is attached to the strut with two large horizontal bolts. There are two other ball joints – one on the lower control arm, and one on the steering tie rod.
The steering tie rod ball joint is held by a bolt, castle nut and a cotter pin. Once these are removed, the rod end can be separated by tapping the bolt from below with a mallet. Be careful not to damage the grease boot around the ball joint. Once the steering tie rod is removed, the wheel hub can be steered by hand making it easier to access the back side.

Next, remove the two horizontal bolts and nuts that hold the steering knuckle to the strut. Once these are off, the steering knuckle can be tilted outwards and the axle can be tapped out of the hub splines.
Next, remove the bolt and nut on the lower backside. This bolt acts like a locking nut for the bottom ball joint. Then the steering knuckle can be simply lifted out of the lower ball joint.

The last item is the speed sensor (only on the passenger side), which is held by one bolt. But it may be frozen in place, and may have to be tapped out with a mallet from underneath.
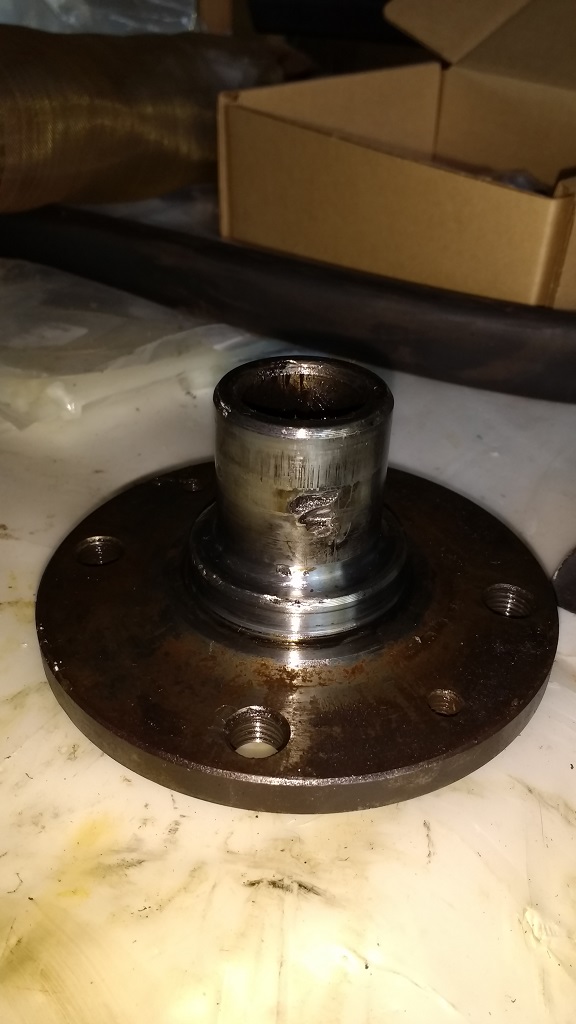
With the steering knuckle on the bench, the wheel hub can be knocked out with the right sized socket and a hammer. Then the two wheel bearings and the spacer should simply fall out.

Inspect the wheel hub for damage. Mine had a lot of gouges, which is another evidence of incorrect preloading by the previous mechanic, so clearly it had to be replaced. It is a cheap item, so it is best to replace it if you get this far into the process.
Clean the steering knuckle in a solvent bath so it is easier to work with.
The next step is to remove the races. This can be a bit tricky. It comes off easier if the body is heated with a propane torch to slightly expand it. Then go around the rim and knock the races with a screw driver and hammer. It takes a while, but it will come off eventually.

Then install the new races. Make sure the races go in straight and not tilted. A bearing installer kit is extremely useful here. Here is a very handy trick. Place the new races in dry ice for a few minutes (you can buy dry ice in many grocery stores). This will shrink the races enough to simply drop them into the hole without the need for any force.
Setting the Bearing Preload
This is a topic of much confusion, and most mechanics (including the Kia dealership mechanics) don’t seem to know how to do this properly. Typically they send the whole steering knuckle to a machine shop. The machine shop will simply reuse the existing spacer assuming that is the correct size for this vehicle. Because the bearings and races are manufactured to very tight tolerances, it may be ok to reuse the old spacer, but if the shop loses your spacer, they may simply grab another one from the shelf, or worse, they might not even use a spacer. This is where the real problem begins. My bearings failed six times within 24 months – two of them were done by a professional transmission shop, and four of them were done by the Kia dealer. Don’t trust anyone to do this correctly, and you don’t need a machine shop either. Do it yourself and save thousands of dollars in wasted repair cost.
The basic idea is to find the correct spacer length that will give the specified rolling friction for the specified axle nut torque (typically 150 ft-lb). If the spacer is too short, the bearings will be under too much compression. If the spacer is too long, the bearings will have too much play. Both will result in premature failure of the bearings and races. The difference between too short and too long can be as little as 4 mils (100 micrometers). Every bearing and race is slightly different, which is why reusing the old spacer is guaranteed to cause problems.
The correct spacer length is determined by assembling the bearings and spacer into the steering knuckle on the bench and measuring the rolling friction. Of course, since the real axle is in the vehicle, and the wheel hub is not yet installed, we need something else that can simulate their function. There is a special tool from Kia which costs $90 (part number 0K130 331 016), but this is really not necessary. Here is how you can do this without the special tool.
Find a short metal tube (aluminum is fine) 38mm in diameter, and roughly 1” in length. It may be easier get a 1 ½-inch diameter tube and lightly sand it down to 38mm. The inside hole diameter of the tube should be at least ½”, but larger is ok as well. The purpose of this tube is to keep the spacer aligned to the wheel bearings. In the vehicle, all three parts ride on the same hub shaft, so they are automatically aligned, but on the bench we need this tube to do that job.

The bearings and the spacer should slide snugly over this tube.

With the new races already installed, clamp the steering knuckle on a vice. Install the two bearings, spacer and the aluminum tube into the steering knuckle.

Then select a proper sized puck from the bearing installer kit to hold the bearings on one side of the steering knuckle. Slide a long ½”-diameter bolt through the whole assembly. Place a second puck on the other side, and use a nut to clamp everything in place.
Tighten the nut, lightly at first, and measure the rolling friction. This can be done with a long wrench and a fishing scale. The rolling friction should be between 2 and 10 inch-lb. When measured 4-inches from the bolt the force on the scale should be 0.5-2.5 lb. This is a low enough that the assembly should turn easily by hand. If it is too tight, that means a longer spacer is needed. The goal is to incrementally torque the nut to 150 ft-lb while keeping the rolling friction between 2 and 10 inch-lb.

Since the spacer length is determined by trial and error, you need many different sizes on hand. This could be a problem because there are 21 different sizes from 6.285mm to 7.085mm. Each one costs about $5, and they are only available through a Kia parts distributor (even they will have to special order it, so be prepared to wait a few days). This brings up a question – how are they repairing wheel bearings if they don’t have all the spacers in stock, but I digress.
Once the correct spacer is found, disassemble everything from the bench, and install the two bearings with the spacer and the two end-seals with plenty of lithium lubricant. The hub should be pressed in carefully because it is a tight fit. Use the bearing installer pucks with a long bolt to pull the hub into the bearings. Then install everything in the vehicle and tighten the axle nut to 150 ft-lb. The rolling friction should automatically reach the previously set limit of 2-10 inch-lb. Of course, you can’t verify the rolling friction at this stage, which is why it is important to set the preload on the bench. This is the factory specified procedure, and if you do it this way, you will not have any problems with wheel bearings.
Here is the Chapter from the Kia Manual on Front Hub Axle Repair Procedures
Leave a Reply